Living in the Philippines is like living in summer your whole life. Except of course for the occasional rainy months when we’re bombarded with typhoons left and right. Other than that, and if we are lucky, we have a month of two of cold weather, thank the monsoon wind traveling from the Antarctic to Southeast Asia.
You probably all know what goes well with summer, less is more. So I made this accessory for your daily wear. All day, all night, in the whole of seven days, all year round! Do not fret, this is so easy to make, you can make dozens in a matter of time you can’t possibly think of. You can easily wash it if it gets dirty then you can wear it over and over again. You can make this in different colors to match every outfit you have in your wardrobe. Or you can wear two different colored bracelets at the same time for that extra spunk!
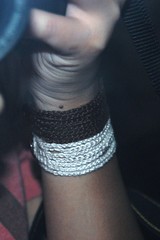
7-Days Summer Bracelet
Design by: Gennie Pascual - Corbito
Level: Beginner
Size: 2cm x 15 cm
Materials:
cotton crochet thread size 8
2.50 mm crochet hook
button
blunt eye needle
stitch marker
Abbreviations:
ch = chain; sc = single crochet; sk = skip
Directions:
R1: ch 51 (mark the 5th ch); leave about 25 cm. tail to be used for attaching the button later; turn.
R2: sc on the 2nd ch from hook and in each of the next 4 ch; ch 40; sk 40 ch; sc on the 5th ch of R1 and in each of the next 4 ch; (10 sc 40 ch)
R3: ch1, turn; sc on the 1st sc and in each of the next 4 sc; ch 40; sk 40 ch; sc on the 5th sc of the previous row and in each of the next 4 sc. (10 sc 40 ch)
R4-R7: repeat R3
Button hole: working on side of the rows, ch 1; sc on the end of R7; ch 5 (make adjustments according to the size of your button); sc on the end of R1; fasten off.
Attach the button using the 25 cm tail threaded into the blunt eye needle. Make sure that the button is placed in R4.
Adjustments and Fitting:
Ideally, the fitting should be the size of your wrist around plus enough space for a finger. To make adjustments, you may increase or decrease the number of chains in the middle of the bracelet.
You may follow this simple equation for adjustments:
5 chains + 40 chains (may be adjusted) + (5+1) chains
Designer Notes:
This is a free pattern by
Gennie Pascual, also known as Gene of
gene + experiments blog (
http://gene-experiments.blogspot.com.) I reserve the copyrights to this pattern and/or instructions which mean you cannot reprint or distribute this elsewhere without my written consent. You can make lots of this bracelet and give as gifts but you cannot sell it. In short,
the written instructions, photograph, design and pattern are intended for personal, non-commercial use only. If you have questions regarding this pattern or violent reactions maybe, feel free to contact me
here. If you love my work, please let me know, I would love to see it!
Have fun!
More details in
Ravelry.